Hi again! In part I of this topic, we described how to configure SAIP. Now that we have the configuration done, we will explain how to configure SoapUI to test our SAIP services against it. And we will finally trigger some messages!
As a summary, we will learn how to: configure SoapUI, run some Snapshots -batch integration- to verify the Snapshot files and the orchestration messages.
Configuring SoapUI
SoapUI will act as the third party system receiving the information from PeopleSoft Campus Solutions -remember: courses/classes, enrolments, and personal information. We will use SoapUI mock services to simulate the third party system.
Snapshot orchestration – bulk data exchange
We need to model the same orchestration described in part I, we will copy the same picture:
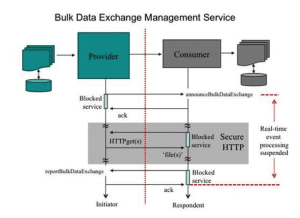
That means we need to configure two main aspects:
- To start a transaction, SAIP sends an announce message (announceBulkDataExchange) when it generates the Snapshots. It notifies the third party system that the Snapshot files have been sent via FTP or URL, so it can process them. We will configure a mock service in SoapUI to listen the announce message and return a response to SAIP.
- The third party system sends a report message (reportBulkDataExchange) when it finishes processing the Snapshot files, to indicate if it finished OK or not, and to communicate any issue at item level. This message is required in SAIP to close the bulk communication. In a real life situation, the third party system would dynamically build this message, based on the transaction ID, the information of the messages, and the processing result. That means that we need to build one report message for each transaction, after we know what information has been sent. Hence, we will detail the last bits about how to create the message after generating the snapshots. We will also add credentials to the message -the same credentials we configured in PeopleSoft in Part I.
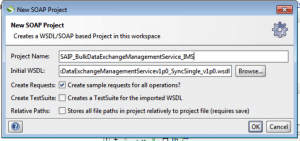
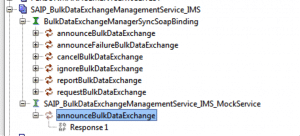
Import Bulk services definition
We can generate the SoapUI Project importing the IMS WSDL definitions. We use the Initial WSDL from the IMS web site (available here). Select File > New SOAP project, and insert the provided URL in the ‘Initial WSDL’ field, and then rename the project as preferred. We press OK, and the new project is created:
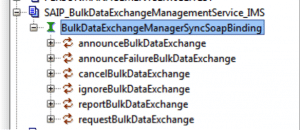
We will get something similar to this:
Configure the bulk announcement mock service
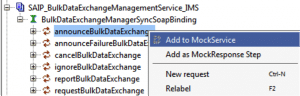
After we import the project, we can create, configure, and start the mock service:
- Create the mock service: Right click on the announceBulkDataExchange operation, and select ‘Add to SOAP MockService’. We can rename, then we press OK. Then we press OK again when it asks ‘Open the MockResponse editor’. The mock service is created, and includes a response. It is an empty response, so the next step is to modify it.
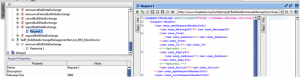
- Edit response: This is the response message the mock service will send back to PeopleSoft. We used a very simple message that only returns ‘success’:
<soapenv:Envelope xmlns:soapenv="https://schemas.xmlsoap.org/soap/envelope/" xmlns:ims="https://www.imsglobal.org/services/lis/bdems1p0/wsdl11/sync/imsbdems_v1p0">
   <soapenv:Header>
     <ims:imsx_syncResponseHeaderInfo>
         <ims:imsx_version>V1.0</ims:imsx_version>
         <ims:imsx_messageIdentifier>0</ims:imsx_messageIdentifier>
         <!--Optional:-->
         <ims:imsx_sendingAgentIdentifier>CS</ims:imsx_sendingAgentIdentifier>
         <ims:imsx_statusInfo>
           <ims:imsx_codeMajor>Success</ims:imsx_codeMajor>
           <ims:imsx_severity>Status</ims:imsx_severity>
           <ims:imsx_messageRefIdentifier>fullsuccess</ims:imsx_messageRefIdentifier>
           <!--Zero or more repetitions:-->
           <ims:imsx_operationRefIdentifier>announceBulkDataExchange</ims:imsx_operationRefIdentifier>
         </ims:imsx_statusInfo>
     </ims:imsx_syncResponseHeaderInfo>
   </soapenv:Header>
   <soapenv:Body>
     <ims:announceBulkDataExchangeResponse>
     </ims:announceBulkDataExchangeResponse>
   </soapenv:Body>
</soapenv:Envelope>
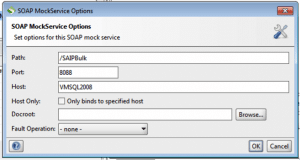
- Finally, we update the mock service parameters. If the mock service is running, we first stop it. Then we double click on the mock service, and press the options button. We must use the same port and path configured in the target setup. As in our case we used the URL ‘https://vmsql2008.cy2.nl:8088/SAIPBulk’, we must use port 8088 and path ‘SAIPBulk’. This depends on your own port configuration.
If you followed the above steps, you can activate the mock service: right click and select ‘Restart’ or open the service and press the ‘play’ symbol. We are ready to receive the announce message, so we could generate a snapshot and see the messages! However, we will complete the configuration before starting the shooting.
Configure the bulk report message
As we explained above, each report message must be tailored to the transaction it is answering to. Therefore, we will complete the following steps to create the message:
- Firstly, we expand the message configuration of the reportBulkDataExchange service operation. Then we double click on the Request 1 message. We can rename and include the transaction code in the name for easier tracking.
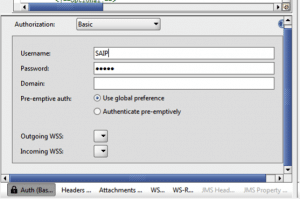
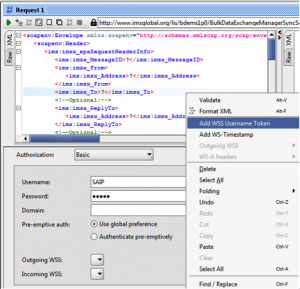
- Secondly, for adding the web service credentials we configured in PeopleSoft, we select ‘Auth’ at the bottom of the request window, and select ‘Add New Authorization’. We select Basic, and then fill the Username and Password

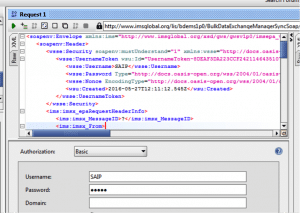
- Thirdly, once the user and password are inserted, we right click over the message, and select ‘Add WSS Username Token’. It inserts the Web Service security group in the XML message.
- Finally, in the last step we build the actual message. However, as we explained before, we first need to generate the snapshots to get the required information. Because of that, we will complete the message configuration in the chapter ‘Testing SAIP against SoapUI’
Testing SAIP against SoapUI
Now SAIP and SoapUI configurations are completed, so we can start our tests.
Snapshot transaction testing
Run Snapshot
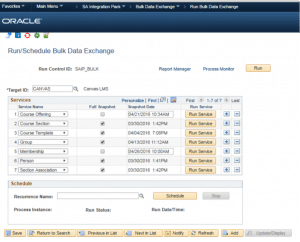
Navigation: SA Integration Pack > Bulk Data Exchange > Run Bulk Data Exchange.
We create a new run control for the process, select the target ID (Canvas in our example), and include all the Service Names available. There have some options when we run the Bulk Data Exchange process:
- We can run all the services at once, using the ‘Run’ button, or individually, using the ‘Run Service’ buttons at service level. For the initial testing, it’s simpler to use individual services.
- We can send full snapshots (sending every item in scope, regardless of what has been sent before), or incremental snapshots (sending changes since the snapshot date). If we do not mark the ‘full snapshot’ option, but we leave the snapshot date empty, we will also generate a full snapshot. The first time we run a service, and also if we want to ‘restart’ the interface, we run full snapshots.
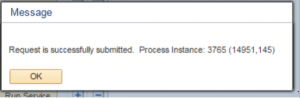
We ran a full snapshot of the Group service.
Review the announce message in the Integration Broker
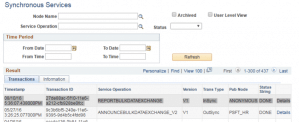
Navigation: PeopleTools > Integration Broker > Service Operations Monitor > Monitoring > Synchronous Services
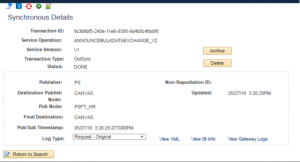
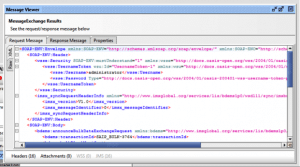
We search the ANNOUNCEBULKDATAEXCHANGE_V2 service operation. We will find one occurrence of that service operation from the time we ran the process. To review the message, we press details, and in the new screen, we select Log Type Request – Transformed (because SAIP transforms internally the message to comply with the LIS format).
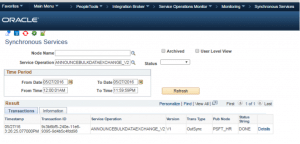
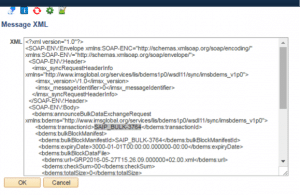
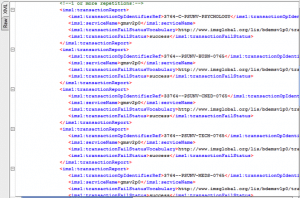
The XML message includes transaction ID, and we can also review what entities were sent. We sent the ‘Group’ snapshot, therefore we will find the following entity types: Institutions, Organizations and Terms.
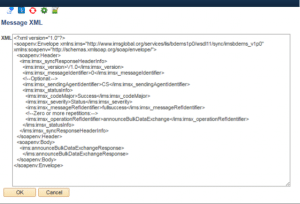
We can also check the response received from SoapUI, selecting the Log Type ‘Response – Original’. Therefore we can verify that it is the same response we previously configured in SoapUI.
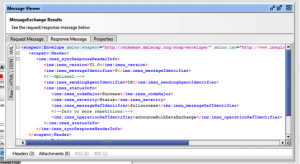
Review the received message in SoapUI
We can analyse the messages in SoapUI the same way we did in PeopleSoft. The mock server logs the incoming messages, we can see the message that SAIP sent at the bottom of the mock service screen.

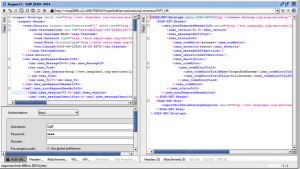
If we double click on the item, we can review both the announce request and response messages. The first tab shows the request message. Note that it includes the Web Service Security Group with the credentials configured in the PeopleSoft Integration Broker (user ‘administrator’). See the Node configuration in the ‘Integration Broker configuration’ described in Part I of this guide.
The second tab shows the response message, in one line. Right click on the message and select ‘format XML’ to expand it.
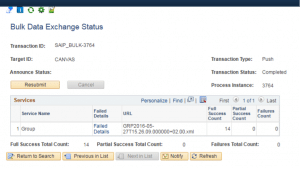
Review the snapshot status in SAIP
Navigation: SA Integration Pack > Bulk Data Exchange > Bulk Data Exchange Status
SAIP registers each transaction, and we can review them in the ‘Bulk Data Exchange Status’ component. In case an issue happened with the announce message, it is possible to resubmit it, or even cancel the transaction. Once the external system has processed the files, and sent a report message, the transaction status will change to completed. As you can see in the picture, the status of the transaction is ‘Announced’, because we did not submit yet the report message from SoapUI.
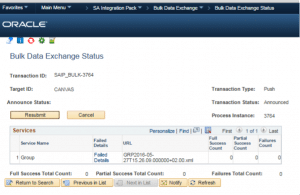
After receiving the report message, the amount of information available in the Bulk Data Exchange Status component, for a particular transaction, highly depends on the information sent in the report message. We can opt to send only summary information, or to send the status of each transmitted item (course, person, enrol,…). If we send a ‘success’ message, the transaction status will be updated to ‘Completed’.
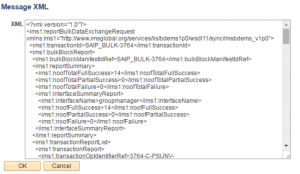
Build and submit the report message
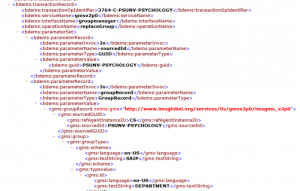
The report message depends, as remarked before, on the Snapshot file(s) we sent in the transaction. However, we will not copy the whole file, we will use the following screenshots to show the header information, and detail about one of the items sent (‘3764-C-PSUNV-PSYCOLOGY’, equivalent to the ‘Psychology’ organisation in PeopleSoft Campus Solutions, the only one we included in the Scope).
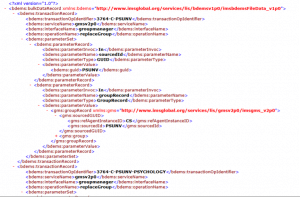
With this information we complete the report message:
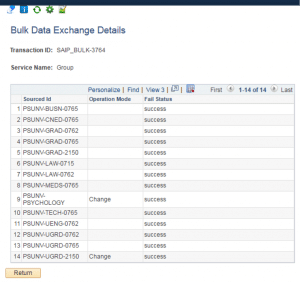
- In the header we need to use the same transaction ID we sent from SAIP. And for each interface (group, course, enrol,..) specify the number o success, partial success and failure items. We sent 14 items belonging to the group interface (institution, organisation, and several terms in scope), so we only insert the ‘groupmanager’ interface name, and 14 successes.

- Furthermore, we included all the items in the transaction report list.
As a result, when our report message is finished -making sure we inserted the Web Service security token, and the correct URL-, we can run it pressing the play button. SoapUI will receive the response from the Integration Broker. Possible issues:
- Security information is not correct
- We selected some security verification in the service operation configuration (encryption, SSL,..) but we did not configure it in SoapUI. We used none.
- The URL is not valid
- Connectivity issues
Consequently, if all the configuration is OK, we will receive a ‘success’ status in the response.
The Integration Broker registers the communication too:
Finally, we review the transaction status, to verify it is completed, and to review the transaction metadata. For that, we use again the Bulk Data Exchange Status component.
Conclusions
With the last verification, we finished the Snapshot testing. We have verified the Snapshot generation and the announce message, creating a valid response. Furthermore, we have created a report message, based on the the Snapshot information, and we have confirmed that SAIP completes the Snapshot transaction upon receiving it.
Note that we have tested mostly the orchestration messages, but we can also verify that all the items sent in the Snapshot files are in scope. In our testing, we verified that the scope was valid for all the files. Please do the same in your own testing process. Moreover, you should test all the Snapshot file types, from group to person services.
In a real life scenario, we must address the requirements of the third party system receiving the messages and the Snapshots. Some systems may require certain transformation to be able to process them, so please verify the compliance with the IMS standards. In the worst case scenario, where transformations are required in the files and messages, having a middleware service bus would highly simplify the end-to-end communication.
SAIP also includes Event Triggers, to support real time integration. We have not included the Event Triggers testing, for now we leave it to you. While the basic configuration and the Snapshot testing requires some effort, you will find out that Event Triggering can be tested really quick once the previous task have been completed.
We sincerely hope you enjoyed this post as much as we enjoyed writing it, and that it helps you in your own SAIP project. Thanks a lot for reading us!