Ever wondered how you could restyle the tiles on the Oracle Fluid landingpage? During the summer my colleague Lukas Degens blogged here about how we applied the corporate branding of Leiden University. At first glance it reminded me of the office365 look. In this blog we cover the technical aspects of how we can brand the landing page without customizations and use a CSS only approach.
This would be the end result.

Looking at the above picture we created the following features.
- Square tiles with no dropshadow
- Tiles have different colors.
- Embedded logo of the university.
- Different font-size on the tiles (Vestula).
- Customized SVG icons.
- Images on the tile appear in the upper-left corner while text appears on the bottom.
Note: The complete stylesheet can be found at the bottom of this page.
Getting Prepared
Lukas quickly mentioned the use of themes in his blog. So let me elaborate on that. What we want to do is create a custom theme that fires off once a person has a specific role. To do so, we need three things in place.
- Having a custom stylesheet in our branding objects
- Hook this stylesheet into a theme.
- Tie this theme to a Role
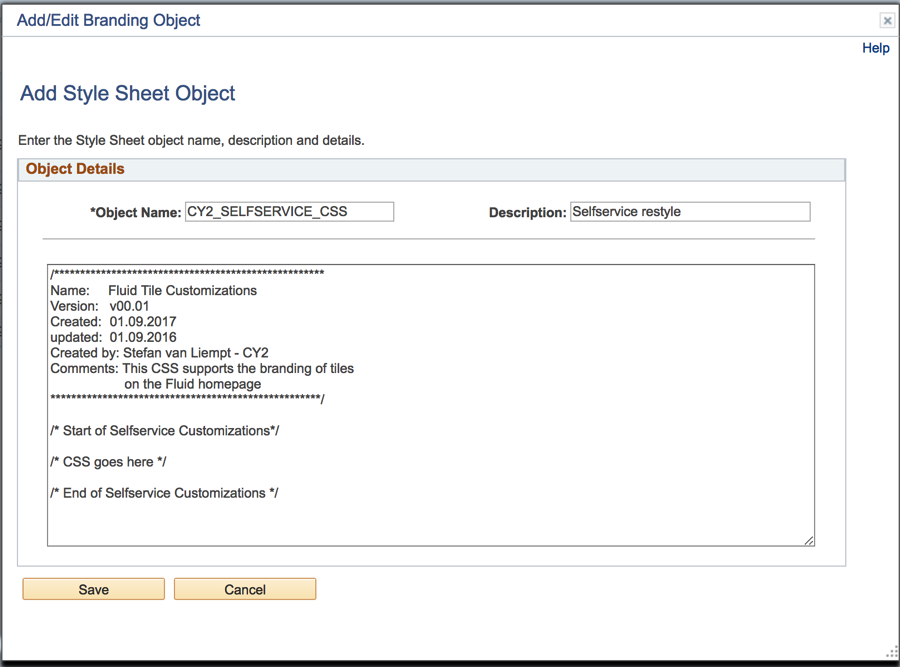
Go to PeopleTools > Portal > Branding > Branding Objects and create a new custom stylesheet. I called mine: CY2_SELFSERVICE_CSS
For now, just create an empty ‘shell’ and save the stylesheet. See below picture.
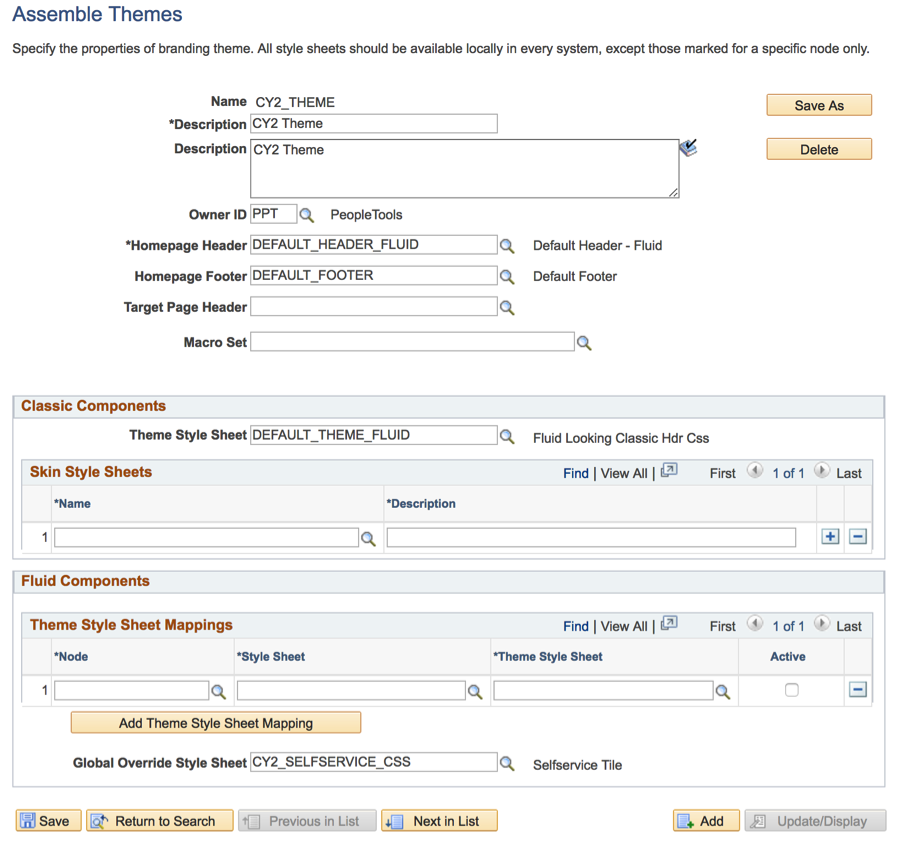
Then go to Peopletools> Portal > Branding > Assemble Themes
The screenshot below shows the theme I created, it’s called CY2_THEME. I copied the DEFAULT_THEME_FLUID and changed the Global Override StyleSheet to CY2_SELFSERVICE_CSS. Below picture shows the result.
Finally, you can use the Assign theme page to attach a role to this specific theme. Once a user has this specific role / permission list, this theme kicks off, resulting in the global overriding Stylesheet we are about to create.
CSS step1: Getting those colored tiles
If it comes to branding tiles, there is one important thing you should know. Tiles can be re-ordered into the landingpage and therefore have a dynamic id. So it is quite a challenge to get the right ID of those tiles while their location is uncertain. Fortunately CSS does a great job!
To get a specific tile, regardless of its position, we can refer to the onclick attribute most tiles have. Almost every tile points to some kind of URL and in the DOM. This URL is visible as an onclick property. For better isolation of this project, I added a custom query string at the end in the URL as identifier for the project.
Take a look at the CREF screenshot below. It points to the classic Student Selfservice Class Schedule. Also note the query string ?LEI_V_SS=Y at the end of the url.

Using the inspector we can see this tile representing the following HTML.

To identify this tile with CSS, we make use of the onclick and the extra query parameter:
div[id^="win"][id*="GROUPLET"][onclick*="SA_LEARNER_SERVICES.SSR_SSENRL_SCHD_W.GBL"][onclick*="LEI_V_SS=Y"].ps_box-group.psc_layout.nuilp{
 background:#f46e32;; /* your color */
}
You can repeat this behavior for the rest of the tiles that you want to have a different colour. just replace the ‘onclick’ with a different part of another URL.
CSS step2: Make it square without drop shadow
We can follow the similar approach when creating square tiles and remove their drop shadows. This time I leave out the onclick part of the main url, because I want all tiles to be square and without having a drop shadow. I leave the LEI_V_SS=Y in, so it only affects the tiles tied to our project.
div[id^="win"][id*="GROUPLET"][onclick*="LEI_V_SS"].ps_box-group.psc_layout.psc_rowact.nuilp{
   %BP(border-radius: 0);
   %BP(box-shadow:none);
}
CSS step3: Image and text placement and hover
To change the image and text location, we can play around with some margins.
div[id^="win"][id*="GROUPLET"][onclick*="LEI_V_SS"].ps_box-group.psc_layout.nuilp > div > img.ps_process{
  margin-left:10%;
  margin-top:0em;
  width:65px;
}
This is for the text.
div[id^="win"][id*="GROUPLET"][onclick*="LEI_V_SS"].ps_box-group.psc_layout.nuilp> h2 > span{
  margin-top:65%;
  margin-left:10%;
  font: normal 22px Vestula;
  color: #fffff;
}
This is for the hover:
div[id^="win"][id*="GROUPLET"][onclick*="LEI_V_SS=Y"].ps_box-group.psc_layout.nuilp:hover{
  background-color:#7f88ab;
  opacity:0.5;
}
CSS step4: Embedded logo
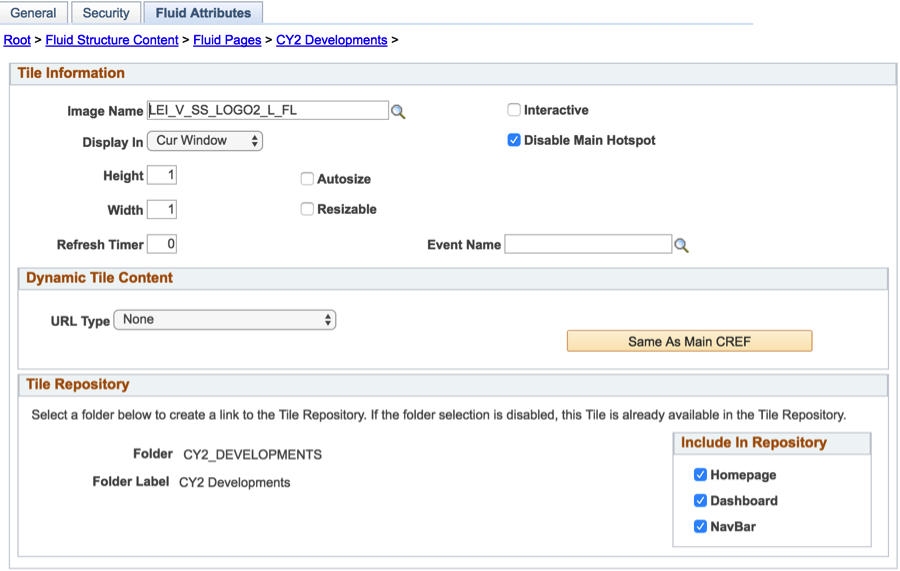
One of the best design ideas I have seen on the landingpage is to embed the logo on it. Actually this idea came from the branding specialist of Leiden itself. In order to do so, we need to make a custom tile. Furthermore we need to make it non-clickable, by checking the Disable Main Hotspot.
One disadvantage of disabling the Main Hotspot is that we lose our onclick as an attribute in the DOM. In our case the embedded logo will always be the last tile, so we could take advantage of the :last-child CSS selector.

Basically the embedded logo is a combination of giving the tile a similar background- and text color as the landingpage itself. By removing the drop shadow of the tile, you won’t even notice it’s a tile anymore. The following three CSS blocks are needed to get that embedded logo.
/*Give the tile title the same color as the tile background - we don't want to see it*/
div.ps_grid-div.ps_grid-body > div[id*="_row_"]:last-child > * >
[id^="win"][id*="GROUPLET"]:not([onclick]):not([role]).ps_box-group.psc_layout.nuilp > h2 > span{
   color:f0f0f0;
}
/*Give the embedded image a width and opacity*/
div.ps_grid-div.ps_grid-body > div[id*="_row_"]:last-child > * >
[id^="win"][id*="GROUPLET"]:not([onclick]):not([role]).ps_box-group.psc_layout.nuilp> div > img.ps_process{
   max-width:100%;
   max-height:100%
   width:190px;
   opacity: 0.6;
}
/* Remove the dropshadow*/

div.ps_grid-div.ps_grid-body > div[id*="_row_"]:last-child > * >
[id^="win"][id*="GROUPLET"]:not([onclick]):not([role]).ps_box-group.psc_layout.nuilp{
   background:f0f0f0;
   %BP(box-shadow:none);
}
Step5: Installing your font
Install your font on the webserver. I am using the PUM Image of CS with tools 8.55. Place the .woff file in the following location:
/home/pasadm2/psft/pt/8.55/webserv/peoplesoft/applications/peoplesoft/PORTAL.war/pas/fonts.
In the CSS refer to this font with the following construct:
@font-face {
 font-family: Vestula;
 src: url("../fonts/vestula-regular.woff2") format("woff2"),
 url("../fonts/vestula-regular.woff") format("woff");
 font-weight: normal;
 font-style: normal;
}
Conclusion
As you can see, rebranding can be done with pure CSS quite easily.
In a follow-up post I will show you how we could leverage the Macro Themes together with our CSS. Happy styling.
Please download the full css at the GitHub: https://github.com/stefancy2/BrandingTiles